Log an expense and attach the receipt
Record a cost with its receipt, and on Solo Pro and up let the app read the receipt and fill in the form for you.
Every cost you record goes into your expenses, your reports and, if you keep tax records, your Cash Book once it's paid. Upload the receipt first and it's kept with the expense.
Before you start
Expenses are on every plan. Free includes 10 expenses a month; Solo and up have no monthly limit.
Reading the receipt for you (Auto-fill from receipt) is on Solo Pro and up, with 30 reads a month on Solo Pro. It is off until you switch it on, because the receipt image is sent to Anthropic, an AI provider in the United States: open Settings from the left sidebar, choose Integrations, and under AI features switch on Receipt scanning.
Add the expense
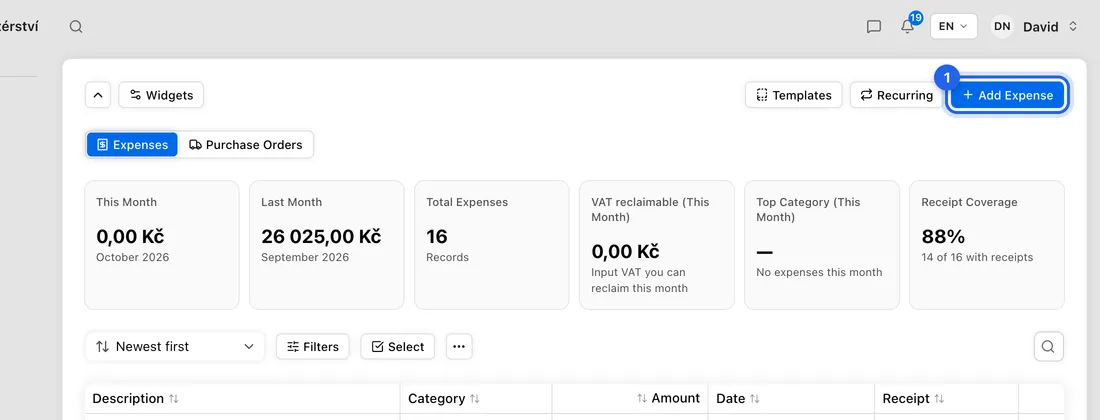
- 1Click Expenses in the left sidebar, then click Add Expense at the top right.
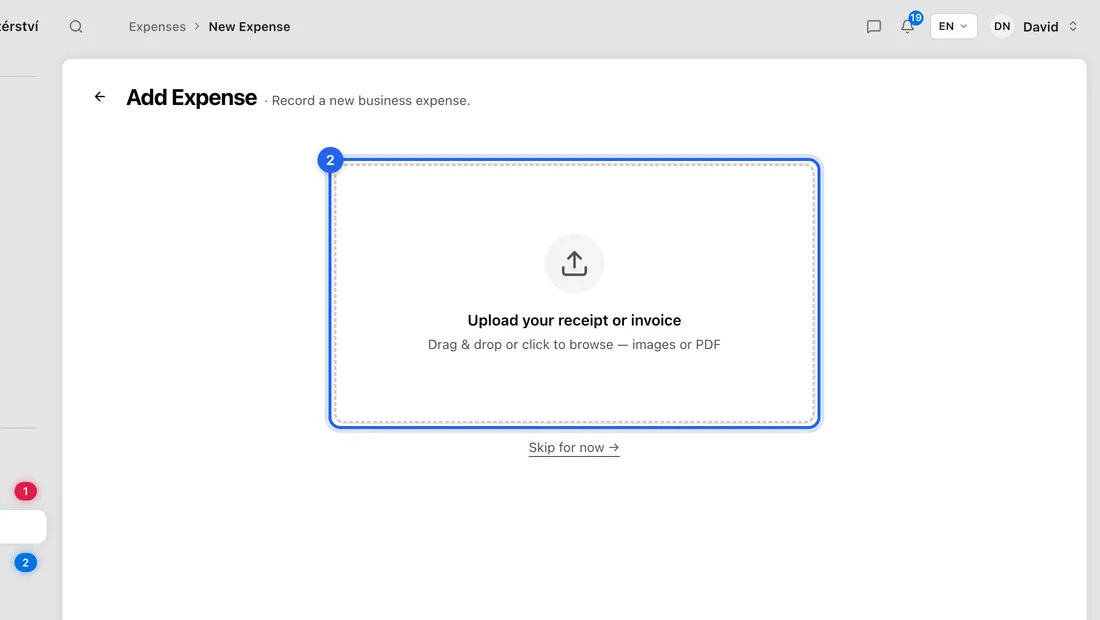
- 2Under Upload your receipt or invoice, drag the file in or click the box to choose it. JPEG, PNG, WebP or PDF, up to 5 MB. No receipt to hand? Click Skip for now →.
- 3On Solo Pro and up, click Auto-fill from receipt under the preview. After Reading receipt… you'll see e.g. “Auto-filled 6 fields — please review before saving.” Check every field against the receipt.
- 4Pick a Category. It starts on Fuel, so change it if that's not right.
- 5Under Details, write a Description, e.g. “Copper pipe for the Novák bathroom”.
- 6Under Amount & Date, type the Amount you paid, including VAT, and check the Date. Add a Due date if it's an invoice you'll pay later.
- 7If you've already paid it, under Payment switch on Paid and check Paid on.
- 8Fill in Supplier and Document number if the receipt has them. With both filled in, the expense is also filed as a received invoice under Purchases.
- 9Click Add Expense. You'll see “Expense added” and land back on your expenses list.
The VAT box
The amount you type is taken as including VAT, and the VAT inside it is worked out from VAT rate. For example, 1 210 Kč at 21% splits into 1 000 Kč before VAT and 210 Kč VAT. You can overwrite either figure.
VAT payers also see Deductible for VAT return: untick it for personal or entertainment costs, or set Deductible % (e.g. 50 for a car you also use privately). If you're not a VAT payer, the VAT is recorded only so you can claim it back if you register later; it doesn't change your tax return.
Good to know
An expense can't be linked to a job, so it won't show in that job's profit figures.
There's no camera mode: on a phone, take the photo first and then choose it. HEIC photos (the iPhone default) are not accepted, so pick a JPEG or PNG instead.
Spend the same thing often? Click Add & Save as Template instead of Add Expense, and next time start from From template.
If something doesn't work
“Please enter a valid amount”: Amount is empty or zero.
“Please wait for the receipt to finish uploading”: wait for Uploading… to disappear, then save again.
“File exceeds 5MB limit” or “Invalid file type…”: shrink the photo or save it as JPEG, PNG or PDF. (The message lists GIF, but GIF isn't accepted.)
“Receipt scanning is switched off for this workspace…”: switch on Receipt scanning in Settings → Integrations.
“quota_exceeded” when you click Auto-fill from receipt or Add Expense: you've used this month's receipt reads, or Free's 10 expenses. Fill the form by hand, or upgrade.
“Couldn't extract anything from the receipt”: the photo was too blurry or dark. Fill the fields in by hand.
“You have already recorded invoice … from this supplier.”: that document is already in the app. Click Open it to go to the existing one instead of entering it twice.