Set up your shop
Put services and packages on your public shop page, choose whether customers book, pay or ask first, then arrange the page.
Your shop is a public page listing the services and packages you sell. For each one you decide what happens when a customer picks it: they book a time, pay first and then book, or send a request that you approve. Your profile and your shop are two different links: the profile is about you, the shop is what people can buy.
Before you start
The shop is available on Solo and up.
Your shop shares its web address with your bookings page, so the bookings page has to be switched on: go to Settings → Scheduling → Bookings page, turn on Accept Public Bookings (it should say “Bookings page is live”) and click Save changes.
“Buy now — pay then book” takes a card payment, so it needs a connected payment gateway (Solo Pro and up). Without one you can still use the other two options.
Put an item on the shop
- 1Open Services & Products from the left sidebar (under Business). Click New product, or open an existing item's ⋯ menu and choose Edit.
- 2Under Type choose Service (a bookable appointment) or Package (a block of sessions). Give it a Name and a price.
- 3Scroll to Sell on the Shop and turn the switch on. It should say “Listed on your shop”.
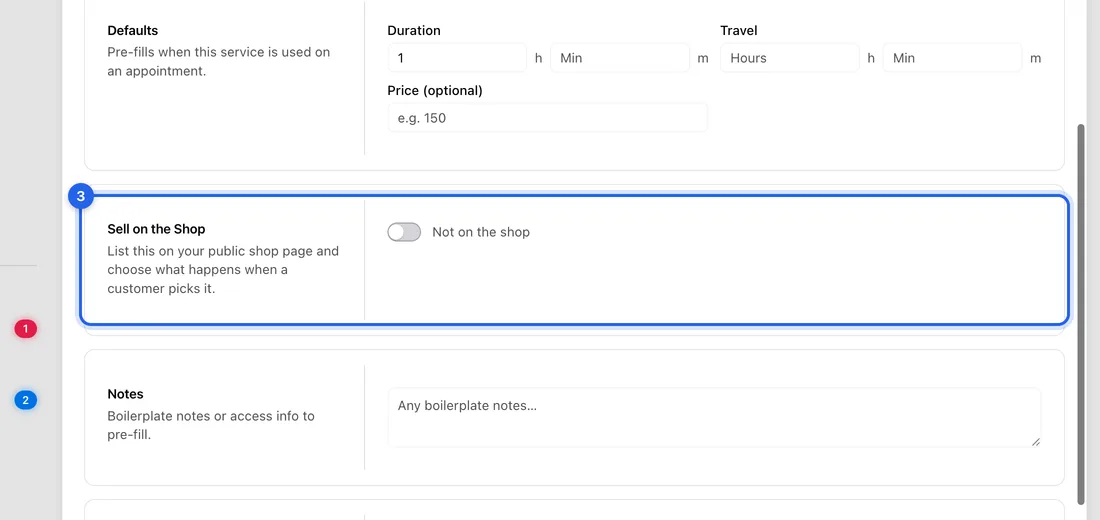
- 4Optionally pick a Shop category to group it on the page.
- 5Under When a customer picks it, choose Send to the booking page, Buy now — pay then book, or Request first — you approve. Packages can't use the booking page option.
- 6Make sure Active is on at the bottom, then click Save.
Arrange the shop page
- 1Go to Settings → Business → Storefront.
- 2Click Add row, then click the + on a row to add a block, such as Banner, Text or Product grid.
- 3Click a block to edit it. For a Product grid, choose what to Show (all products, services only, packages only, a category, or hand-picked ones), and whether it shows as Cards or Rows.
- 4Drag a block by its grip to move it, or drag a row's handle to reorder rows.
- 5Check that the Version you're editing is the live one. If it isn't, click Make live.
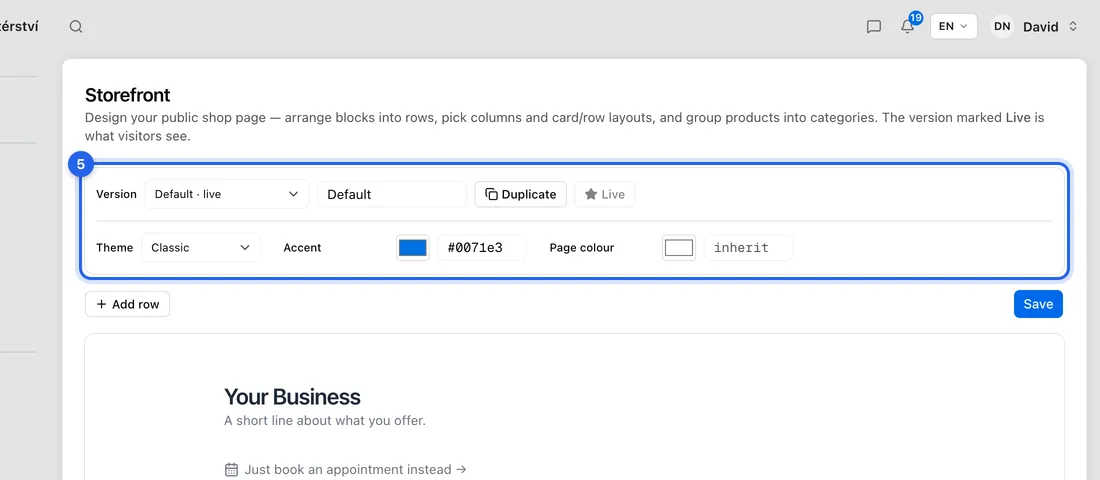
- 6Click Save. Then click View live shop to see the page your customers will see.
What happens next
Send your shop link to customers. You'll find it under Settings → Scheduling → Bookings page, in Public URL next to Shop, with a copy button.
Send to the booking page: the customer picks a time on your bookings page. Buy now: they pay the full price, then get a link to book. Request first: the order appears under Pending orders at the top of Services & Products. Click Approve to email them an invoice, after which they get a link to pay and book, or Decline to turn it down (they're emailed either way).
If something doesn't work
Customers see “Shop not found”: your bookings page is switched off, your web address is still awaiting admin review, or your plan doesn't include the shop.
“Set a price before selling this on the shop”: Buy now and Request first need a price. Add one and save again.
“Buy now — pay then book (needs a gateway)” is greyed out: connect a payment gateway in Settings → Integrations first.
“No shop products yet” in a Product grid: no item has Sell on the Shop switched on yet.
An item is missing from the shop: check that both Sell on the Shop and Active are on.